
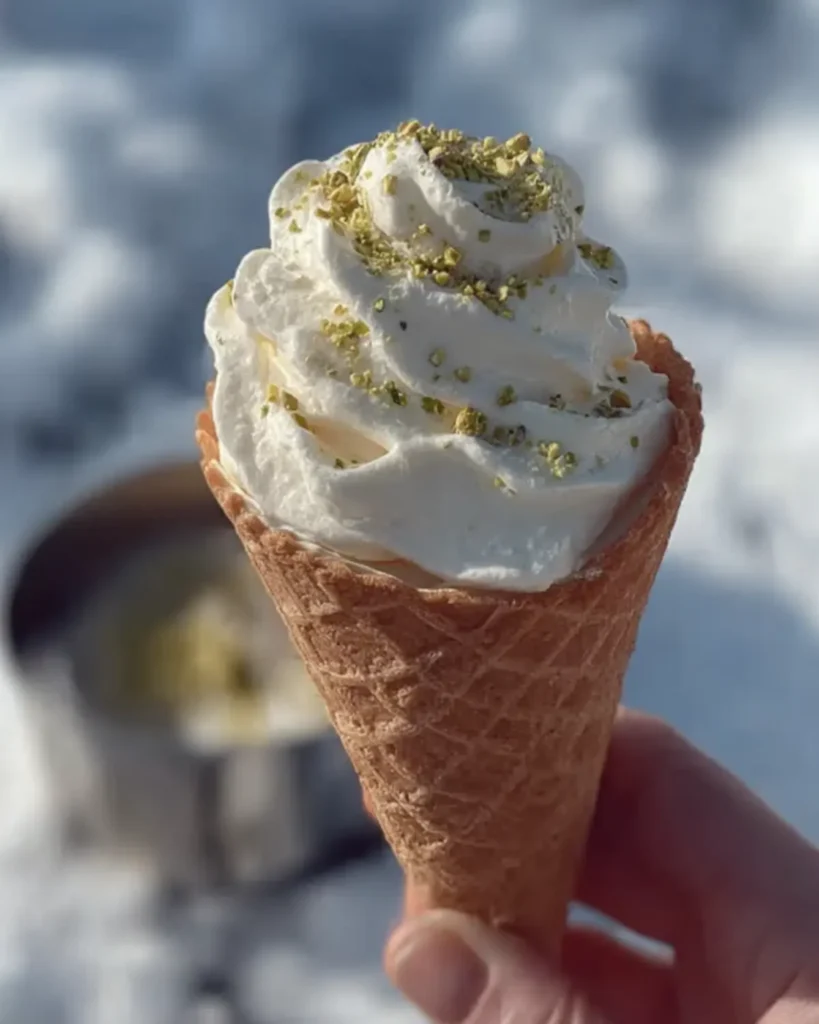
A No-Churn Winter Snack That’s Taking Over TikTok
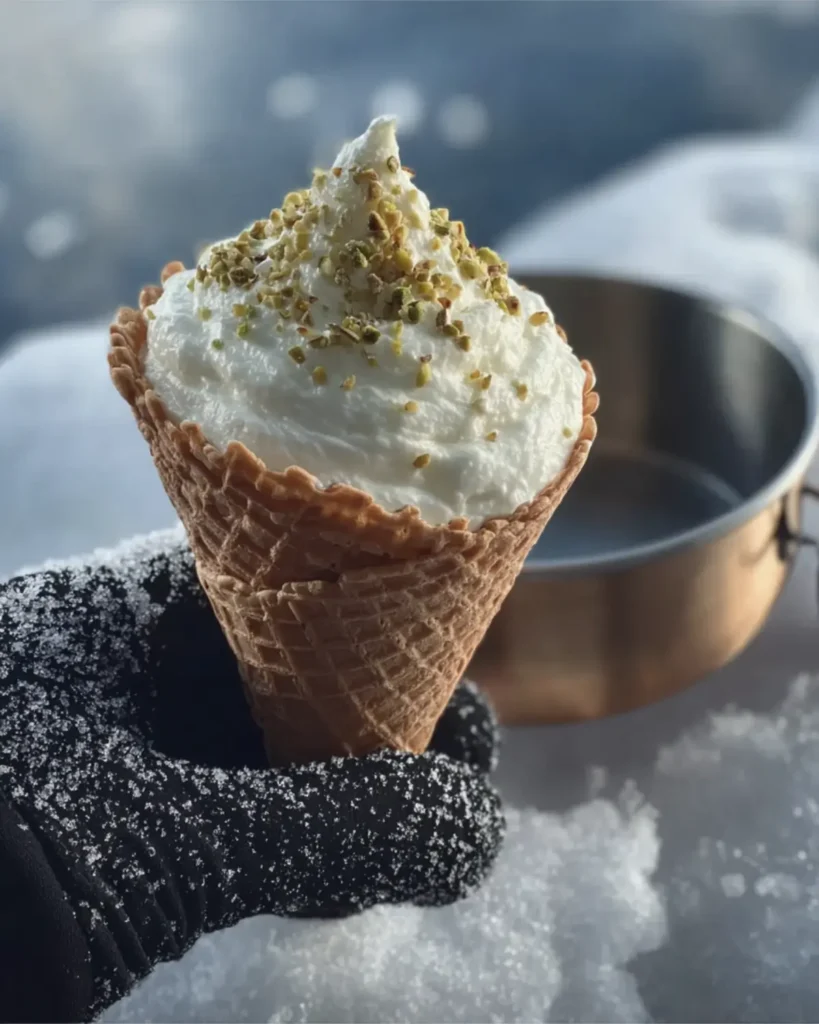
The Viral Snow Ice Cream Recipe has taken over social media this winter, and for good reason. It’s fun, creamy, and totally safe to make at home. Unlike traditional snow cream that uses actual snow as an ingredient, this version uses snow as a freezing agent, keeping your ice cream clean and delicious. Because you’re not eating the snow, you can enjoy this creamy dessert without any health concerns. As a result, it’s become the perfect winter activity for kids and families stuck inside on snow days.
Jump To :
- Why You’ll Love This Viral Snow Ice Cream Recipe
- Ingredients for Making Viral Snow Ice Cream at Home
- Tools Needed for the Viral Snow Ice Cream Method
- Step-by-Step Instructions for the Salted Snow Bowl Method
- The Safety Hook: Is Viral Snow Ice Cream Safe to Eat?
- The Science Behind Salt in the Viral Snow Ice Cream Process
- The Ratio: How Much Salt for the Perfect Snow Ice Cream Freeze
- Troubleshooting: Why Isn’t My Viral Snow Ice Cream Freezing?
- Flavor Variations and Serving Ideas
- Educational Fun for Kids
- Dairy-Free and Vegan Snow Ice Cream Options
- Healthy, Keto & High-Protein Variations
- The Secret Ingredient for Softer Scoops
- Can You Freeze Leftover Snow Ice Cream?
- Hosting a Snow Day Ice Cream Bar
- The Canadian Maple Taffy Variation
- The Ancient History of Snow Desserts
- FAQs About Viral Snow Ice Cream
- Conclusion
Why You’ll Love This Viral Snow Ice Cream Recipe
This recipe is trending for more than its viral charm it’s smart, safe, and genuinely tasty. The salted snow bowl method allows you to make ice cream without an ice cream machine, turning your backyard snow into a natural freezer. Because of the salt’s scientific magic, your cream mixture freezes faster than you’d imagine. Therefore, this dessert is not only an indulgent treat but also a mini science lesson. In addition, it’s a great way to teach kids about freezing point depression while making something delicious.
Ingredients for Making Viral Snow Ice Cream at Home
- 1 cup heavy whipping cream
- 1/3 cup sweetened condensed milk
- 1 teaspoon alcohol-free vanilla extract
- 1 large bucket of clean snow (for the freezer, not to eat)
- 1–2 cups rock salt or coarse salt
- Optional: chocolate chips, sprinkles, or pieces of Dubai Chocolate Bar Snack
Tools Needed for the Viral Snow Ice Cream Method
This post may contain affiliate links. As an Amazon Associate, Daily Tasty Recipe earns from qualifying purchases at no extra cost to you.
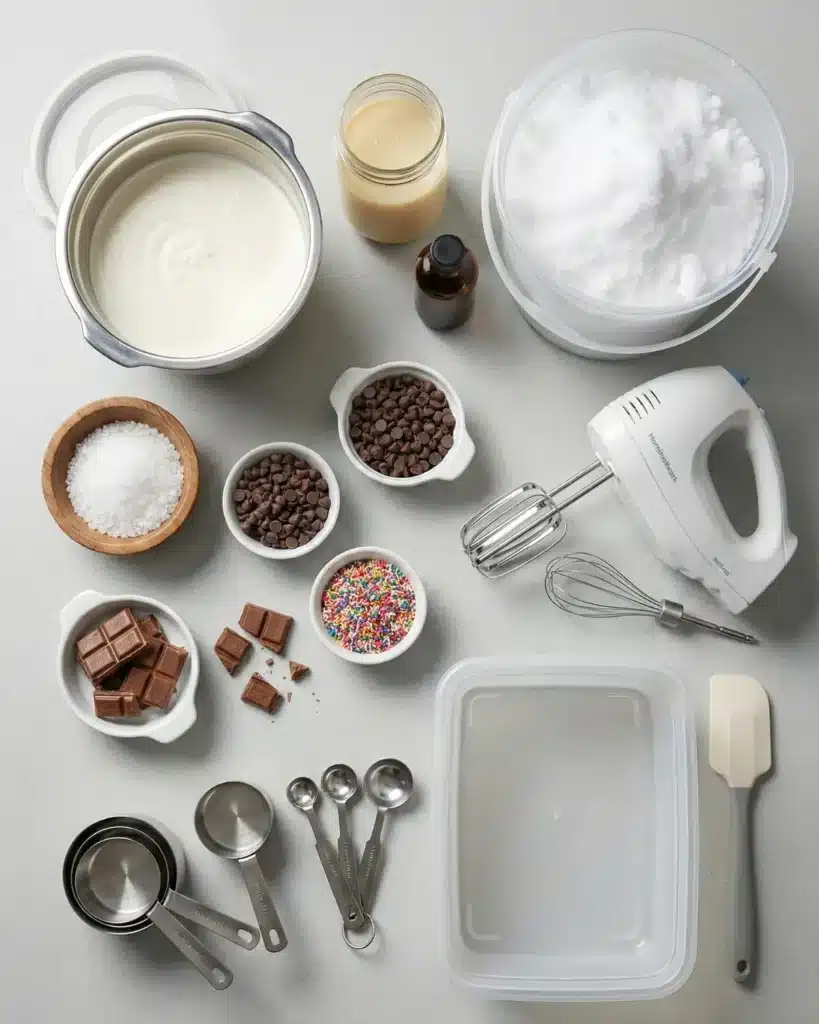
Having the right tools ensures your Viral Snow Ice Cream Recipe turns out perfectly every time. Here’s what you’ll need for the best results:
- Stainless steel mixing bowl – conducts cold efficiently and helps your ice cream freeze faster.
- Hand mixer – creates smooth, creamy texture without over-mixing.
- Measuring spoons and cups – keep ingredient ratios accurate and consistent.
- Large bucket or deep tray – holds the salted snow mixture that acts as your natural freezer.
- Spatula or silicone scraper – makes it easy to fold and mix your ingredients evenly.
Because precision and temperature control matter, using a metal bowl instead of glass or plastic ensures your mixture freezes evenly and quickly. If you want to take it a step further, pre-chill your tools before you begin. This extra step helps the cream set faster and creates that signature soft-serve consistency everyone loves.
Step-by-Step Instructions for the Salted Snow Bowl Method
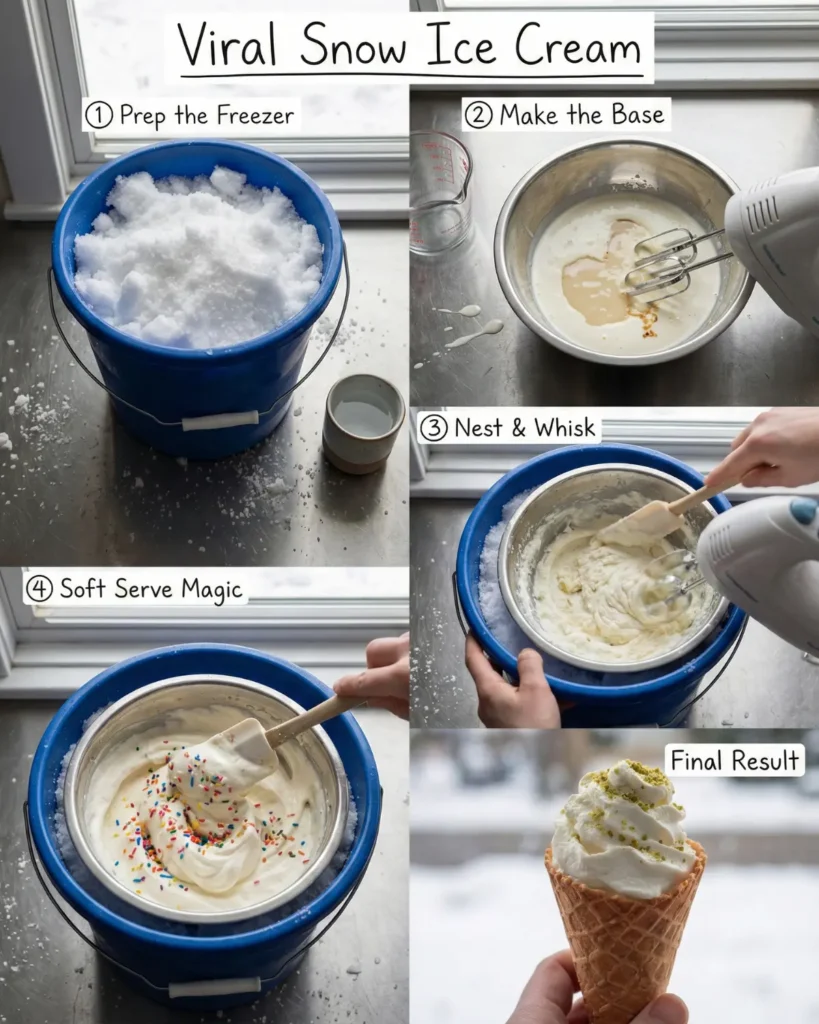
Step 1: Prep the Freezer
Fill a large bucket or deep pan with fresh snow. Pour 1–2 cups of salt (rock salt is best, but table salt works) over the snow. Pro Tip: If your snow is very dry or powdery, add a splash of water to the salt/snow mix. This creates a “slush” that makes better contact with the bowl and freezes the cream faster. The salt lowers the snow’s freezing point, making it colder than ice.
Step 2: Make the Base
In your stainless steel bowl, whisk the heavy whipping cream, sweetened condensed milk, and vanilla until combined. (Note: Using a metal bowl is essential because it conducts cold much faster than glass or ceramic.)
Step 3: The Nest & Whisk
Nestle your metal bowl deep into the salted snow mixture. Pack the snow up the sides of the bowl. Whisk the cream mixture continuously. You will see it start to freeze on the walls of the bowl. Use a spatula to scrape the frozen cream from the walls back into the center.
Step 4: Soft Serve Magic
Keep whisking and scraping for 15–20 minutes. The mixture will transform from liquid to a thick, creamy soft serve. Serve immediately! While you wait for your ice cream to freeze, why not whip up some Christmas Crack Candy for a crunchy topping?
The Safety Hook: Is Viral Snow Ice Cream Safe to Eat?
Unlike traditional recipes where you eat the snow, this viral method uses snow only as a freezing agent, like an old-fashioned churn. Your ice cream stays pristine and safe inside a metal bowl. Because snow can collect pollutants and bacteria, avoiding it in your dessert is the smart choice. Therefore, this method ensures flavor, safety, and cleanliness all while keeping the fun of a snow-day dessert.
| Feature | Traditional Snow Cream (Eating Snow) | Salted Snow Bowl (This Recipe) |
|---|---|---|
| Safety | Risky (Dirt/Pollution) | 100% Safe (Closed Bowl) |
| Texture | Icy / Slushy | Creamy / Soft Serve |
| Ingredients | Snow + Milk + Sugar | Heavy Cream + Condensed Milk |
The Science Behind Salt in the Viral Snow Ice Cream Process
Salt is the secret hero of this Viral Snow Ice Cream Recipe. When you add salt to snow, it lowers the freezing point a concept known as Freezing Point Depression. This causes the snow to melt slightly, pulling heat from its surroundings and becoming even colder. As a result, your cream mixture inside the bowl begins to freeze quickly. Without salt, the snow wouldn’t reach a low enough temperature to turn your cream into ice cream. Consequently, understanding this science makes your dessert both educational and exciting.
The Ratio: How Much Salt for the Perfect Snow Ice Cream Freeze
For the perfect texture, use a ratio of roughly 1 cup of salt to 3–4 cups of snow in your outer bowl. This balance ensures your freezing environment is cold enough to solidify your cream mixture without making it icy. Too little salt, and it won’t freeze. Too much, and your mixture might over-chill before it sets. Therefore, maintaining this ratio creates a smooth, creamy texture every time.
Troubleshooting: Why Isn’t My Viral Snow Ice Cream Freezing?
If your ice cream stays liquid, it’s likely your snow isn’t cold enough, too dry, or you didn’t use enough salt. Pro Tip: Add a splash of water to the snow/salt mixture to activate the salt’s endothermic reaction. This helps it reach lower temperatures quickly. Because metal bowls conduct cold better, switching from plastic or glass can also help. Furthermore, check the weather if the snow is too soft or wet, it may not be cold enough for proper freezing. Therefore, using freshly fallen snow produces the best results.
Flavor Variations and Serving Ideas
The Viral Dubai Chocolate Twist: Want to go fully viral? Chop up a Pistachio Knafeh Chocolate Bar (the viral Dubai chocolate) and fold it into the soft serve at the very end. The crunch of the toasted kataifi pastry pairs perfectly with the creamy vanilla base.
Add personality to your Viral Snow Ice Cream Recipe by experimenting with mix-ins. For a wintery twist, add peppermint extract or crushed candy canes. If you love texture, fold in pieces of Christmas Crack Candy for a crunchy surprise. For an elegant pairing, serve with Swedish Pancakes or drizzle melted chocolate on top. Because the base is so simple, you can adjust it to fit any flavor craving or occasion.
Educational Fun for Kids
This snack doubles as a science experiment. Kids can watch the transformation of liquid cream into ice cream while learning about temperature and chemical reactions. Therefore, this recipe makes a perfect indoor activity for snowy weekends. As a result, it’s no wonder parents and teachers alike are calling this the ultimate winter storm project.
Dairy-Free and Vegan Snow Ice Cream Options
Choosing the Right Plant-Based Milk
You don’t need dairy to enjoy this viral winter dessert. However, not every milk alternative performs the same way. Full-fat canned coconut milk gives the creamiest result because its rich fat content behaves like heavy cream. Oat and almond milk often produce a lighter, icier texture. Therefore, to achieve the perfect soft-serve consistency, use coconut cream or a barista-style oat milk blend. These options help recreate the richness of the traditional version while keeping it completely dairy-free.
Adjusting Sweeteners for Vegan Diets
Since standard sweetened condensed milk contains dairy, a good substitute is coconut condensed milk. It’s thick, sticky, and matches the sugar density of the original. You can also mix maple syrup with a touch of cornstarch for a smoother vegan version. This method makes the base creamy without animal products. For more dairy-free inspiration, check out our Bariatric Gelatin Recipe it’s another light, protein-rich snack perfect for plant-based eaters.
Healthy, Keto & High-Protein Variations
The “Gym Rat” Protein Snow Bowl
Turn your dessert into a post-workout reward by adding extra protein. Just whisk one scoop of vanilla or chocolate whey protein powder into the heavy cream before placing the bowl into your salted snow setup. Because protein powder absorbs some moisture, it helps the mixture thicken faster and keeps the texture creamy even after freezing. As a result, this version melts more slowly and stays soft longer. It’s ideal for meal preppers, athletes, and gym lovers looking for a low-sugar recovery snack. For another energizing idea, try our Peanut Butter Energy Balls Recipe they pair perfectly with this creamy treat.
Low-Carb & Keto Adjustments
If you follow a low-carb or Keto lifestyle, this Viral Snow Ice Cream Recipe adapts easily. Instead of sweetened condensed milk, mix one cup of heavy cream with two tablespoons of powdered Allulose or Erythritol. Because these sweeteners don’t crystallize, your dessert stays silky and smooth. In addition, this adjustment lowers carbs while keeping the rich, soft-serve flavor you love. Therefore, it’s a satisfying, guilt-free option for anyone watching their sugar intake. Enjoy it alongside our Best Zucchini Bread Recipe for a cozy, satisfying winter dessert combo that balances freshness and flavor.
The Secret Ingredient for Softer Scoops
Adding a Splash of Spirits
For an adult twist on this viral snack, try adding a tablespoon of alcohol to your cream base. Stock or bourbon lowers the freezing point, preventing the mixture from becoming rock solid. Consequently, your soft serve stays silky and scoopable for longer. Because alcohol evaporates slowly, it also adds depth of flavor without overpowering the sweetness. However, moderation is key too much will stop it from freezing properly.
Flavor Pairing Ideas
If you prefer a festive spin, add peppermint schnapps or Irish cream to enhance the vanilla flavor. These additions give your ice cream a cozy, holiday aroma. Alternatively, molasses syrup or spiced liqueur pairs beautifully with caramel toppings. For an extra indulgent dessert pairing, try it alongside our Easy Halloween Party Drinks for Kids (for the non-alcoholic crowd) so everyone can join the celebration.
Can You Freeze Leftover Snow Ice Cream?
The Texture Change Warning
Many readers ask whether they can save this treat for later. Unfortunately, this recipe’s magic lies in its freshness. Because it lacks preservatives or stabilizers, freezing it again turns the mixture into a hard, icy block. The air pockets created during whisking collapse, and the smooth texture disappears. Therefore, it’s best to make only what you plan to eat. If you must store leftovers, plan to remix them before serving.
Reviving Frozen Leftovers
If you still decide to freeze your leftover snow ice cream, cover it tightly with plastic wrap to prevent frost. When you’re ready to enjoy it again, leave it at room temperature for about 15 minutes. Then, whisk vigorously to reintroduce air and restore creaminess. It won’t be identical to the original, but it will regain some softness. This trick also works well after enjoying our Swedish Pancakes Recipe if you ever decide to add a warm, comforting side to your next snow day dessert.

Hosting a Snow Day Ice Cream Bar
Setting Up a “Snow Bar” Outdoors
Turn your backyard into a mini ice cream lab by setting up a snow station. Pre-chill your mixing bowls by burying them in the snow for about 30 minutes before making the ice cream. This ensures the cream mixture starts freezing immediately, reducing prep time. Encourage everyone to bring their own toppings, like nuts, candy, or fruit, and watch the excitement grow as each person creates a personal version of this winter treat.
Cozy Warm-Up Pairings
Balance the cold dessert with something warm and comforting. Serve cups of Pumpkin Chili in Edible Pumpkin Bowls or a mug of spiced cocoa for a cozy snow-day meal. The contrast between hot and cold flavors enhances the overall experience. Furthermore, it makes the activity feel festive while giving everyone a way to warm up after playing in the snow.
The Canadian Maple Taffy Variation
Using Snow as a Candy Maker
If you have leftover snow, turn it into maple taffy Canada’s famous “sugar on snow.” Boil pure maple syrup until it reaches the soft-ball stage, then drizzle it over packed snow. The syrup instantly hardens into chewy, caramelized ribbons. Because the snow cools it rapidly, the texture becomes pleasantly stretchy, similar to taffy. This is a fun, interactive addition while waiting for your salted snow bowl to freeze.
Combining Taffy and Cream
Once hardened, break the maple candy into small shards and sprinkle them over your Viral Snow Ice Cream Recipe. The combination of crunchy maple and creamy vanilla is pure magic. It adds a rustic, gourmet flavor without extra effort. For more classic sweet inspiration, explore our Halloween Oreo Bark its texture and chocolatey bite complement this frozen treat perfectly.
The Ancient History of Snow Desserts
From Ancient China to Rome
The idea of frozen snow desserts isn’t new it’s ancient. As early as 2700 BC, Chinese emperors enjoyed crushed snow flavored with fruit and honey. Later, Roman Emperor Nero sent servants to the mountains to collect snow, which was then mixed with juices and sweet syrups. Because refrigeration didn’t exist, this was considered a luxurious treat for the elite. These traditions show that humanity’s fascination with snow-based sweets is timeless.
The Modern Revival
Today’s Salted Snow Bowl method revives those ancient ideas using modern science. Instead of eating raw snow, we use it safely as a freezing tool. The addition of salt and metal enhances precision, hygiene, and efficiency. Therefore, the modern version maintains the nostalgic magic of snow desserts while delivering a creamier, safer experience. For more history-inspired creations, try pairing this with our Swedish Pancakes Recipe for a cozy weekend brunch.
FAQs About Viral Snow Ice Cream
No, because the salt never touches the ice cream it’s only mixed into the snow around the bowl.
Yes, but the texture will be more icy and less creamy. Using heavy cream ensures that smooth, soft-serve feel.
Typically about 15–20 minutes. However, colder snow and more salt can speed things up.
You may need more salt, wetter snow, or a colder environment. Using a metal bowl will significantly help.
You can, but it’s best eaten fresh. Without stabilizers, it freezes solid. If you do store it, let it sit for 10–15 minutes before scooping to soften.
Yes, but rock salt works better. Table salt melts snow faster, so use a bit more and work quickly for the best results.
Conclusion
The Viral Snow Ice Cream Recipe isn’t just another winter dessert; it’s a blend of creativity and chemistry. By using snow as a natural freezer instead of an ingredient, you can safely enjoy this treat all season long. Because it’s easy, fun, and educational, this snack has earned its viral fame. Make it today, and bring the joy of winter straight to your kitchen.
Whether you’re a busy parent, a student grabbing snacks on the go, or anyone hungry for something wholesome and delicious, this recipe fits the bill. Don’t forget to leave a comment or tag us with your cooking success! Follow Daily Tasty Recipe on Pinterest and Instagram for more inspiration.
Print
Viral Snow Ice Cream
- Total Time: 20 minutes
- Yield: 4 servings 1x
Description
This Viral Snow Ice Cream Recipe uses the salted snow bowl method to create a creamy, no-churn winter dessert without ever eating snow. It’s fun, safe, and perfect for snowy days with kids, turning science into a delicious soft-serve style treat everyone loves.
Ingredients
- 1 cup heavy whipping cream
- 1/3 cup sweetened condensed milk
- 1 teaspoon alcohol-free vanilla extract
- 1 large bucket of clean snow (for freezing only)
- 1–2 cups rock salt or coarse salt
- Optional mix-ins: chocolate chips, sprinkles, chopped chocolate
Instructions
- Fill a large bucket or deep tray with fresh snow and sprinkle evenly with rock salt. Add a small splash of water if snow is very dry.
- In a stainless steel bowl, whisk together heavy whipping cream, sweetened condensed milk, and alcohol-free vanilla extract until combined.
- Nestle the metal bowl deep into the salted snow, packing snow firmly around the sides.
- Whisk continuously as the mixture begins freezing along the bowl edges.
- Scrape frozen cream from the sides back into the center using a spatula.
- Continue whisking and scraping for 15–20 minutes until thick, creamy, and soft-serve in texture.
- Fold in optional toppings and serve immediately.
Notes
The snow is used only as a freezing agent and is never eaten, making this method safer than traditional snow cream. For best results, use a metal bowl and freshly fallen snow.
- Prep Time: 10 minutes
- Cook Time: 0 minutes
- Category: Snack
- Method: No-Churn
- Cuisine: American
Nutrition
- Serving Size: 1/2 cup
- Calories: 220
- Sugar: 18g
- Sodium: 65mg
- Fat: 16g
- Saturated Fat: 10g
- Unsaturated Fat: 5g
- Trans Fat: 0g
- Carbohydrates: 18g
- Fiber: 0g
- Protein: 3g
- Cholesterol: 55mg